
Grand Canyon Photography Guide: Best Spots, Light & Timing
The famous south rim overlooks are worth making. But the Grand Canyon images I keep coming back to came from a remote western overlook that requires 60 miles of unpaved road to reach — and from the North Rim in October, when the crowds are gone and the canyon light gets serious.
Fine Art Prints
Grand Canyon photographs — Toroweap Overlook on 4x5 large format film, Cape Royal on the North Rim. Limited edition fine art prints.
The Grand Canyon has been photographed so many times that the photographs already exist in your head before you arrive. South rim overlooks, the horizontal rock layers from rim to rim, the mile-deep canyon filled with haze. Those shots are worth making. But the most memorable Grand Canyon images I've produced came from two places that require more than parking at Mather Point.
One is Cape Royal on the North Rim. The other is Toroweap Overlook, 60 miles down an unpaved road that becomes impassable when wet, where the canyon rim drops 3,000 feet straight to the Colorado River with no guardrails between you and the edge. I've shot both on 4x5 large format film and digital, in different seasons, and what follows is what I actually learned from being there.
Getting to the Grand Canyon
The Grand Canyon has two photographer-accessible rims. The south rim is what most people mean when they say "Grand Canyon." It's open year-round, has full infrastructure, and sits about 80 miles north of Williams, Arizona, on Highway 64.
South Rim Driving Times
- Phoenix: 225 miles via I-17 and US-89 (~3.5 hours)
- Las Vegas: 275 miles via US-93 and AZ-64 (~4 hours)
- Los Angeles: 490 miles via I-40 (~7 hours)
- Flagstaff: 80 miles via US-89 and AZ-64 (~1.5 hours)
The North Rim is less visited and more interesting for photographers. It sits at 8,000 feet, closes from mid-October through mid-May due to snow, and requires driving around the canyon rather than across it — about 215 miles from the South Rim by road.
North Rim Driving Times
- Las Vegas: 265 miles via US-89A (~4 hours)
- Flagstaff: 210 miles via US-89 and US-89A (~3.5 hours)
- Salt Lake City: 350 miles via I-15 and US-89 (~5.5 hours)
Toroweap Overlook
Toroweap (also called Tuweep) sits on the western end of the North Rim and deserves its own section. Take Highway 389 west from Fredonia, Arizona, then 60 miles of unpaved BLM road to the overlook. High clearance is strongly recommended. The road turns to mud in rain and becomes impassable. There's a primitive campground at the overlook with about 10 sites — no water, no services, minimal cell coverage. I've made the drive twice, once specifically for the 4x5 film shoot. Plan on camping the night before your shoot. The drive back on that road in the dark after shooting isn't worth the alternative.
Fees (2026)
- South Rim: $35 per vehicle (7-day pass). America the Beautiful annual pass accepted.
- North Rim: Same fee, separate entrance station.
- Toroweap: No fee — BLM land. Self-registration required at the site.
Verify current fees and reservation requirements at nps.gov/grca before your trip.
Best Time of Year for Grand Canyon Photography
- Spring (March through May): Shoulder season on the south rim means manageable crowds through April. Occasional snow at rim level in March. Clear skies more common than summer, and good morning light without haze.
- Summer (June through August): Busy. Monsoon season starts in July and afternoon thunderstorms build over the canyon, producing the most dramatic sky conditions of the year. If you can tolerate heat and crowds, storm light in July and August is unlike any other time.
- Fall (September through October): My preferred window. Crowds thin, the light gets a lower angle that works better on canyon walls, and the aspen groves near the North Rim lodge go yellow in October before the rim closes for the season. Get to the North Rim before mid-October.
- Winter (November through February): South rim only — the North Rim road closes. Snow at the rim is possible but not guaranteed. When it happens, the contrast between white rim and red canyon walls is exceptional. Clear winter mornings produce the cleanest light. Crowds are minimal.
For time of day: the canyon is wide and deep enough that there's no single rule. East-facing walls catch morning light; west-facing walls catch evening light. What you're actually chasing is the moment when direct sun hits the canyon walls you're looking at while the depths behind them are still in shadow. That contrast is what gives the images depth.
Grand Canyon Photography Locations
South Rim: Mather Point
The first stop for most visitors arriving from the south entrance, and the most photographed viewpoint in the park. It juts out into the canyon and gives you a wide view with the canyon opening in multiple directions. Best in the morning when the east-facing walls catch the sun. Also the most crowded point at sunrise by a significant margin. If you're there in summer, show up at least 45 minutes before sunrise to find a position.
South Rim: Yavapai Point
A short walk east of Mather Point, Yavapai gives a slightly elevated view and is consistently less crowded. The geology museum here is worth 20 minutes — understanding the rock layers you're looking at changes how you frame the canyon. Good for afternoon shooting when the west-facing walls go warm.
South Rim: Moran Point
Seventeen miles east of the main village on Desert View Drive, named for the painter Thomas Moran who was here in 1873 before there was a road. Less traffic than the main overlooks and a more intimate view — you're looking down a side canyon rather than across the full chasm. Good for isolating compositional elements rather than doing the panoramic shot. Worth stopping if you're driving the east rim road anyway.
South Rim: Desert View Watchtower
Twenty-five miles east of the main village at the east entrance. The stone watchtower gives you an elevated platform with views into the canyon and east toward the Painted Desert and Navajo lands. The Colorado River is visible from the top on clear days — it's rarely visible from the main south rim overlooks. A worthwhile detour if you're driving the full south rim road.
North Rim: Cape Royal
The southernmost viewpoint on the North Rim road, 23 miles from the lodge on a paved road. The viewpoint faces south and slightly east, with Angel's Window — a natural arch in the Kaibab limestone — providing a foreground element and the Colorado River visible 5,000 feet below. The North Rim closes in winter, so this is a May through October location.
The canyon here is wider than most South Rim viewpoints suggest, and shooting from the North Rim means you're looking south — different light behavior than the south rim opposite. In fall the sun swings far enough south that the cliff face catches the last of the warm light while the canyon fills with shadow behind it. The contrast is severe: foreground rock goes orange-red, the canyon behind it turns purple-gray. You're not photographing the sunset — you're photographing what the sunset does to the rock.
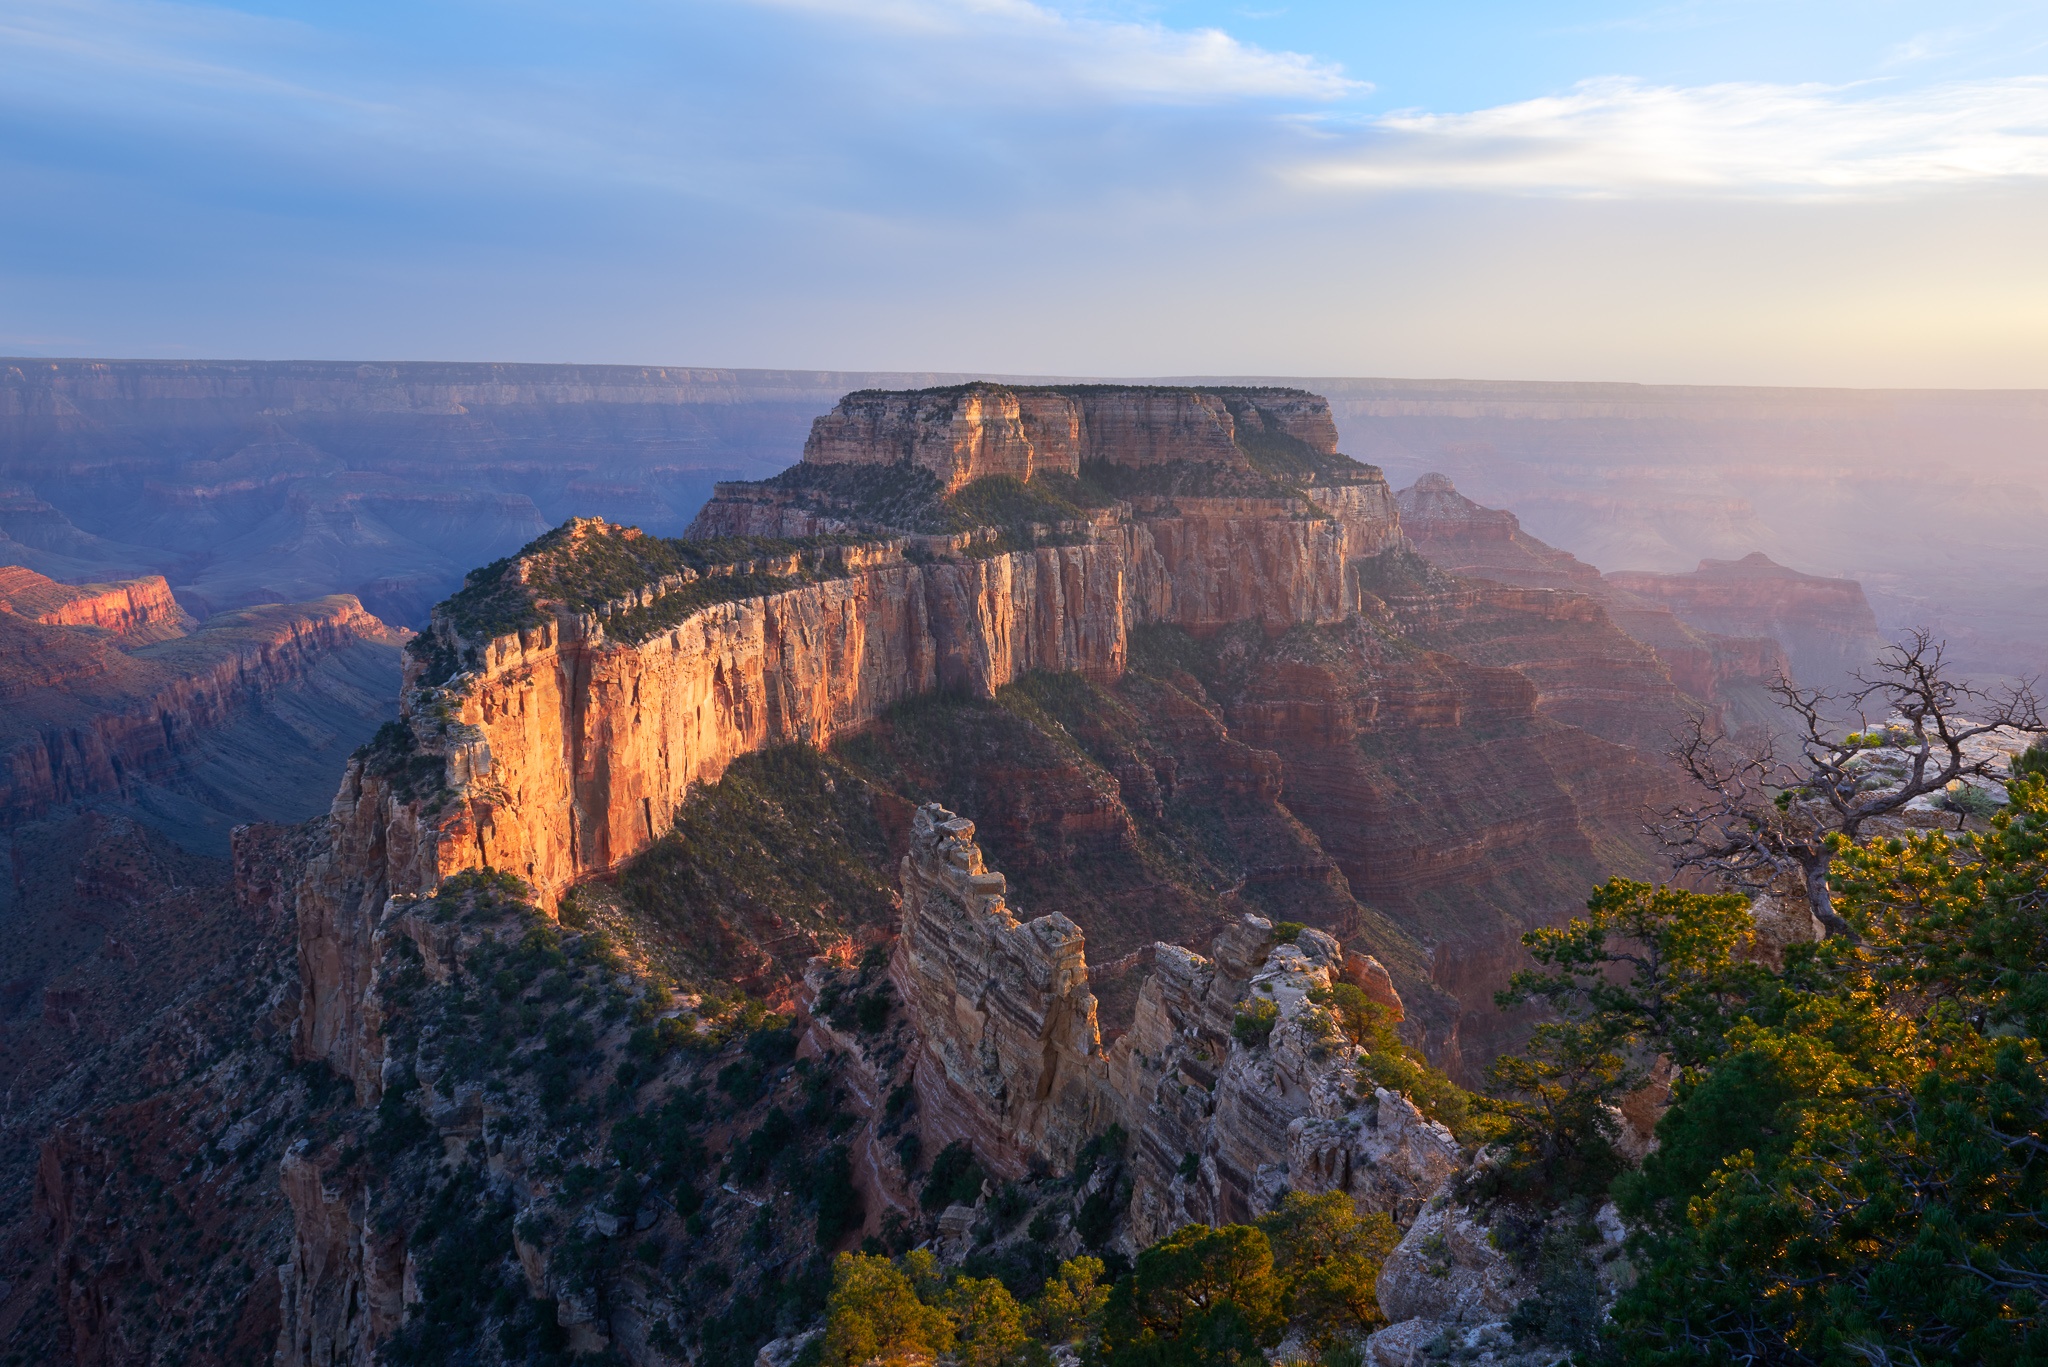
Cape Royal Sunset, Grand Canyon North Rim — Nikon D800. View print details →
North Rim: Point Imperial
The highest overlook on the North Rim at 8,803 feet. Faces northeast with views into the Painted Desert and the Navajo lands beyond the canyon's eastern edge. The canyon here reads differently from any south rim viewpoint — less about the sheer drop and more about the geological distance, the canyon opening toward the desert beyond. Worth the drive from the lodge, especially at sunrise when the eastern orientation works in your favor.
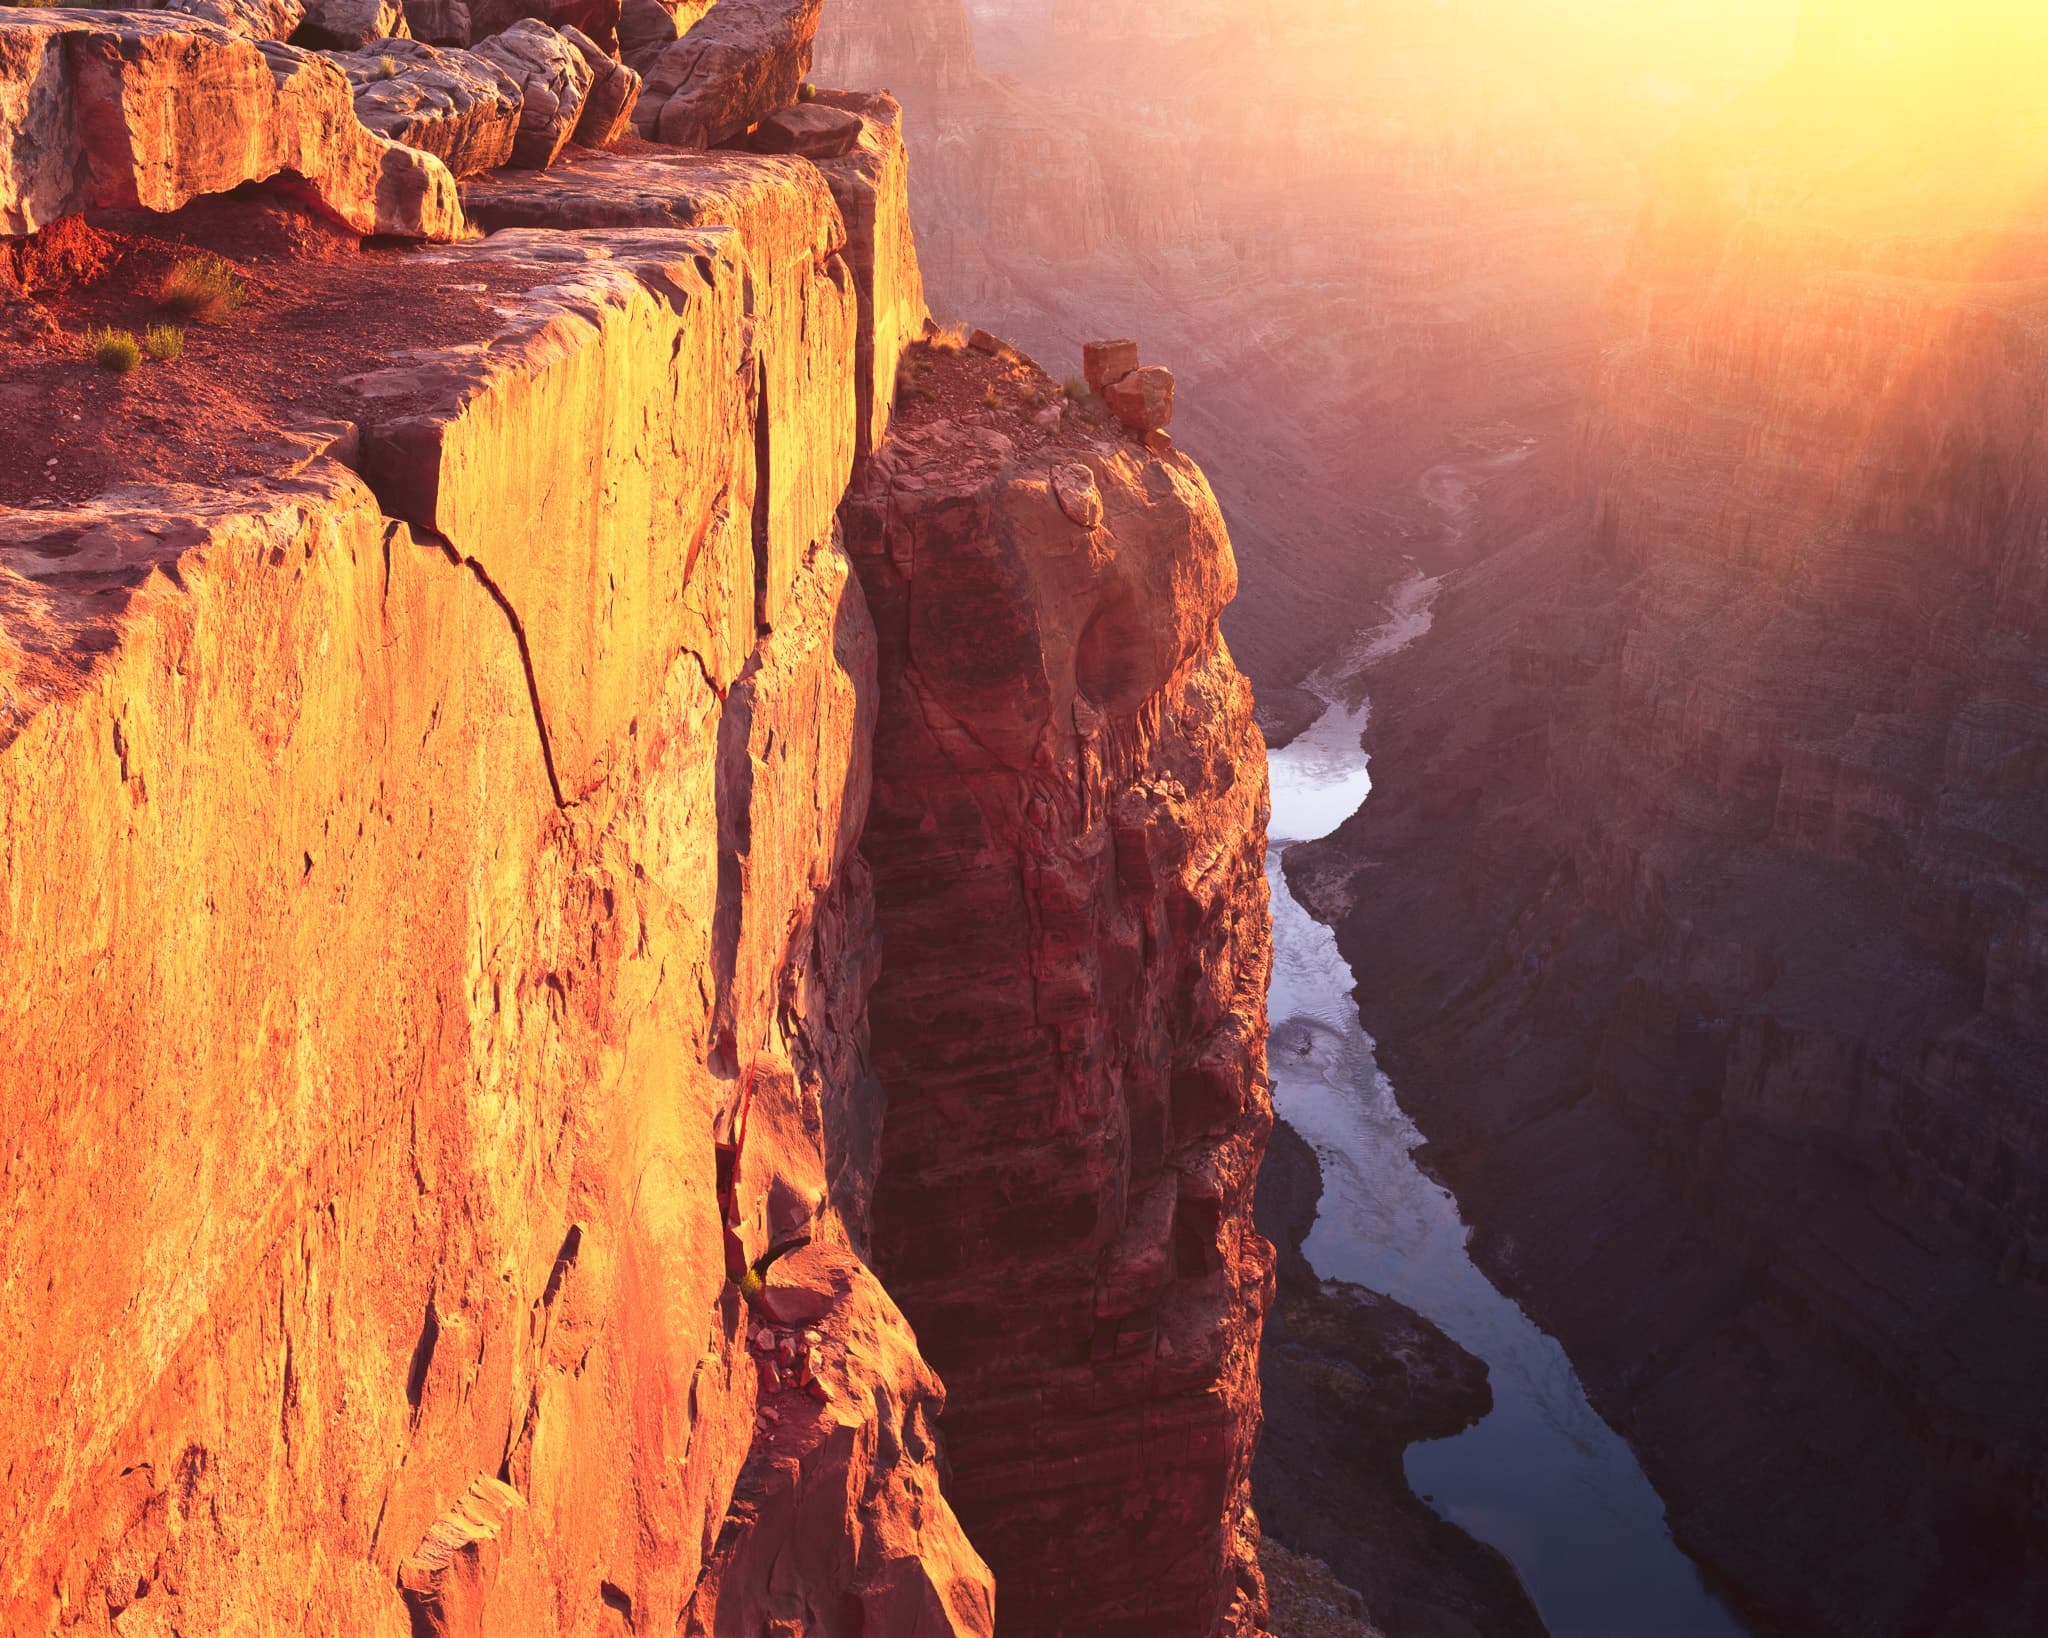
Toroweap Overlook: The Hardest Shot in the Canyon
At Toroweap, the rim drops 3,000 feet straight to the Colorado River without any of the terracing and canyon widening you see from the main viewpoints. From Mather Point or Cape Royal, the river looks small at the bottom of a wide, layered canyon. At Toroweap, the canyon is narrow, the walls are sheer, and the river is directly below you. It's a fundamentally different experience of the same geological feature.
I made the Toroweap Sunrise image on 4x5 large format film, Fujichrome Velvia 50. Setup started before 4 AM in complete darkness, feeling the edge of the rim carefully before setting the tripod down. There are sections of this overlook with nothing between you and a 3,000-foot drop. Watching the canyon go from black to deep purple to orange as the sun came up, the river catching the first direct light while the canyon walls above it were still in shadow — that's what 60 miles of dirt road buys you. It's the best canyon light I've seen anywhere.

Toroweap Sunrise, Grand Canyon — 4x5 large format, Fujichrome Velvia 50. View print details →
Camera Settings for Grand Canyon Photography
Managing the Tonal Range
The canyon's dynamic range is punishing. At sunrise you're managing deep shadow in the canyon depths against bright rim walls in direct sun — a spread of 8 to 10 stops. Graduated ND filters are more useful here than almost anywhere else I shoot. A 2-stop hard-edge grad ND aligned with the rim lets you expose for the canyon interior without blowing the sky or the lit rim.
On 4x5 film at Toroweap: I exposed for the shadowed canyon floor and let the lit rim walls go slightly hot. Velvia handles overexposure badly in general, but the canyon shadows had enough detail to work with and the sky retained color. At f/22 on Velvia 50, exposures at sunrise run from 1/15 to 1/4 second as the light builds — cable release and mirror lockup are non-negotiable at those shutter speeds.
For digital: expose to the right of the histogram and pull back in post. Bracket when you're uncertain about the shadow recovery. The canyon light shifts fast at sunrise and sunset — what works at 6:00 AM is different from 6:20 AM, and the window for rim light against shadowed depths is narrow.
Focal Length Choices
A telephoto in the 200 to 400mm range lets you compress the canyon's geological layers and isolate the banded Kaibab, Toroweap, and Redwall formations. Wide angle (24mm and under) works for the full-canyon compositions at the main overlooks, but watch the foreground — canyon rim rock is often featureless and adds nothing to the frame. Find something to put in the foreground: Angel's Window at Cape Royal, a specific rock formation at the rim edge, or the fence line at Toroweap as a scale reference.
Tripod and Stability
A sturdy tripod is not optional here. Wind on the rim is real and unpredictable, the exposures are long, and a camera bag hanging from the center column introduces vibration at the worst moments. At Toroweap specifically, the ground near the rim edge is uneven — check your tripod legs before you step away from the camera. I've had setups shift on loose rock at the canyon rim. That's not an experience you want to repeat.
Grand Canyon Fine Art Prints
Both Grand Canyon images — Toroweap Sunrise and Cape Royal Sunset — are available as limited edition fine art prints in multiple sizes. The Toroweap image was made on 4x5 Velvia 50 and drum-scanned; it holds detail at large print sizes. Browse the National Parks gallery for the full collection.
For other Arizona canyon country, the Monument Valley photography guide covers the Mittens and Merrick Butte. The Zion National Park photography guide covers Utah canyon country 150 miles north. If you're planning a Southwest circuit, the Death Valley photography guide covers the Mojave salt flats and badlands — a natural extension of any Arizona trip heading west.
Frequently Asked Questions
- What is the best time of year to photograph the Grand Canyon?
- Fall (September through October) offers the best combination of light, manageable crowds, and North Rim access before it closes for the season. Spring (March through May) is good for the south rim with clear skies and lower crowds than summer. Winter is excellent for the south rim only — snow at the rim is possible and the crowds are minimal. Summer produces dramatic monsoon storm light in July and August but at the cost of heat and heavy visitor traffic.
- Which rim is better for Grand Canyon photography?
- The North Rim offers better photography for serious landscape work. It's higher elevation (8,000 feet), less crowded, and the viewpoints — Cape Royal, Point Imperial, and the remote Toroweap Overlook — face south into the canyon rather than across it. The South Rim is more accessible and open year-round, with iconic overlooks at Mather Point, Yavapai Point, and Desert View. If you can only visit one, the South Rim is easier; if you have the flexibility, the North Rim rewards it.
- How do I get to Toroweap Overlook for photography?
- Take Highway 389 west from Fredonia, Arizona, then approximately 60 miles of unpaved BLM road to the overlook. High-clearance vehicles are strongly recommended and the road becomes impassable when wet. There's a primitive campground with about 10 sites — no water, no hookups. Plan to camp the night before your shoot. The overlook drops 3,000 feet straight to the Colorado River with minimal fencing; the pre-dawn setup in darkness requires careful attention to the rim edge.
- What camera settings work best at the Grand Canyon?
- The canyon's dynamic range runs 8 to 10 stops at sunrise and sunset. A 2-stop hard-edge graduated ND filter aligned with the rim helps balance canyon interior against sky. For digital, expose to the right of the histogram and recover shadows in post. For film, expose for the shadow detail you want to keep and accept that lit rim walls may go slightly hot. A sturdy tripod is essential — wind on the rim is real, and long exposures at f/16 or smaller are common in low canyon light.
Explore Related Photography
Enjoyed this article?
Subscribe for more photography stories, techniques, and exclusive behind-the-scenes content.
Related Posts

Best Places to Photograph Snow-Covered Mountains in Winter
Winter transforms mountain landscapes in ways no other season can. Where to go, when to go, and what to expect — from Yosemite's granite walls under fresh snow to Zion's red canyon in a storm.

Analog Landscape Photography: Why Film Still Makes Sense in 2026
Most photographers who've tried 4x5 large format film don't go back to digital for their serious landscape work. Here's the honest case for shooting analog in an era when you have no practical reason to.

Limited Edition Landscape Prints for Sale: Southwest Fine Art Photography
A look at what makes a limited edition landscape print worth owning — how editions work, what media options hold up over decades, and which prints from the American Southwest collection are still available.
Tags

Marty Quinn
Large format film photographer based in Phoenix, Arizona. Shoots on 4x5 Arca-Swiss view cameras across the American Southwest — Utah, Arizona, Death Valley, and the Colorado mountains. 25+ years behind the lens. Published in Outdoor Photographer magazine (The Last Frame, June 2008). About Marty →