
Developing 4x5 Film at Home: Stearman Press SP-445 Review
A comprehensive review of the SP-445 film processing system from Stearman Press, covering the unique loading method, design features, and real-world usage experience for developing sp-445 film and 4x5 sheet film.

Last Updated: March 21, 2018
Developing 4x5 Sheet Film: Why It's More Complicated Than Roll Film
Developing large format sheet film presents unique challenges compared to roll film development. Unlike 35mm or medium format film that can be loaded onto reels and processed in standard tanks, 4x5 inch sheets require specialized equipment and handling techniques. For years, large format photographers have relied on methods ranging from tray development to rotary processors, each with their own advantages and drawbacks. If you're interested in learning more about why I shoot large format, read my article on the art of large format photography.
Recently I ordered the SP-445 film processing system from Stearman Press, a relatively new solution designed to address many of the limitations of traditional 4x5 development methods. After extensive testing and real-world use developing sp-445 film, I wanted to share my comprehensive experience with this innovative system, including both its strengths and areas where it could be improved.
The Challenge of Large Format Film Development
Before diving into the specifics of the SP-445, it's worth understanding why developing 4x5 sheet film has traditionally been more complex than other formats. The large surface area of sheet film makes it prone to uneven development if not properly agitated. Scratches and handling marks are a constant concern, as any contact with hard surfaces during the wet development stage can permanently damage the emulsion.
Traditional methods include tray development, where sheets are manually transferred between trays of developer, stop bath, and fixer—a method that works but requires darkroom facilities and careful handling. Daylight development tanks like the Jobo system offer convenience but are expensive and bulky. Dip-and-dunk methods used by professional labs provide excellent results but require specialized equipment and significant chemical volumes. The SP-445 aims to provide a middle ground: daylight loading, compact size, minimal chemical usage, and consistent results.
What Attracted Me to the SP-445 System
What initially attracted me to the SP-445 was the innovative method of loading the film. Unlike other daylight tanks that require fumbling with film in complete darkness or using special loading techniques, the SP-445 system comes with film holders that are loaded similarly to how film is loaded in a standard camera film holder. You simply slide the film emulsion side up on each side of the special film holders and insert the entire holder into the tank. This familiar loading method significantly reduces the learning curve and minimizes the risk of loading errors.
The system includes two film holders, allowing a total of four sheets to be developed simultaneously while requiring only 16 ounces (475ml) of chemicals per processing cycle. This chemical economy is significant—traditional tray development requires much larger volumes, and even small daylight tanks often need 500-600ml per sheet. The SP-445's efficiency means lower costs per sheet and less environmental impact from chemical disposal.
Design and Build Quality
Overall the design of the SP-445 is very well thought out and executed. The tank is manufactured from durable plastic with clean, precise molding. All liquids are poured into a dedicated Fill/Drain opening, while a separate Vent opening makes filling and emptying the tank smooth and efficient. This two-port system prevents air locks and allows for quick chemical changes—critical when timing is important during the development process.
The tank's compact size is another major advantage. At roughly 6x6x8 inches, it fits easily in a camera bag or backpack, making it practical for field processing if needed. I've taken it on extended trips where I wanted to process film before returning home, and its portability has proven invaluable. The ability to develop film in a hotel room or rental property expands the possibilities for workflow management on long photography trips.
Learning Curve: The Seal Technique
One trick I discovered through trial and error is to squeeze the tank slightly as you tighten the fill and vent caps. This creates extra suction within the tank, ensuring a better seal. I did experience some liquid leaking during my first few uses before discovering this technique—just a few drops, but enough to be concerning when you're investing time and money into each sheet of film.
The O-ring seal could arguably be slightly larger for a more positive seal, but since I've been using the squeeze technique, I haven't had any more issues with leakage. It's worth noting that this is a minor adjustment that becomes second nature after a few processing sessions.
Important Update on Preventing Leaks: After more extensive use, I discovered that I was inadvertently squeezing the tank while agitating the liquid, and that pressure was causing the leaking I initially experienced. The proper technique is to avoid putting any pressure on the sides of the tank during agitation. Squeeze the sides only when you're putting on the vent cap, which should be the last cap you attach. Following this method for my last dozen or so processing sessions has resulted in zero leaking. The key is gentle, consistent agitation without gripping the tank tightly.
Film Holder Design: A Minor Critique
While the overall design is excellent, I do have one small complaint about the film holders themselves. The top tabs that secure the film are not symmetrical—on one side the tab is positioned higher, while on the other it sits lower. This asymmetry means you have to push the film down past the first tab to the second position before it's held securely by both sides. This design makes loading the film slightly more difficult than it could be, requiring extra care to ensure the film is fully seated.
That said, even with this quirk, loading is still considerably easier than other sheet film development systems I've used. Compared to loading film into traditional developing hangers or trying to wrangle sheets into spiral-style holders, the SP-445's method is relatively straightforward. After processing a dozen or so batches, the loading technique becomes muscle memory.
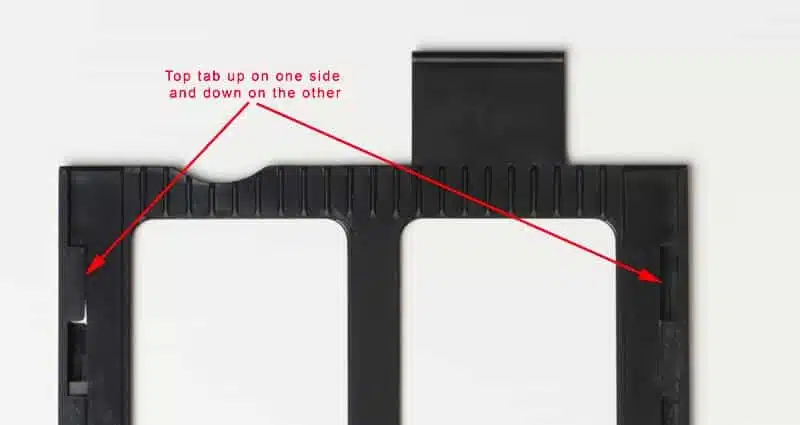
SP-445 film holder showing the uneven tab design that requires careful film loading—note the offset positioning of the securing tabs
The Development Process Step-by-Step
Using the SP-445 in practice involves a straightforward workflow that can be completed in normal room lighting (except for the initial film loading):
1. Loading the Film (Complete Darkness)
In a changing bag or darkroom, remove the exposed sheets from your camera film holders and load them into the SP-445 film holders. Orient each sheet emulsion side up (the emulsion side typically feels slightly different to the touch and has the film notch code in a specific position). The holders accommodate one sheet per side, for a total of two sheets per holder.
2. Tank Assembly (Room Light)
Once loaded, insert both film holders into the tank body. The tank can now be sealed and all subsequent steps performed in normal room lighting—a huge advantage over tray development. Close and seal the tank using the squeeze technique described earlier.
3. Pre-Soak (Optional but Recommended)
Fill the tank with water at your target development temperature (typically 68°F/20°C) and allow the film to soak for 1-2 minutes. This pre-soak helps ensure even development by allowing the film base to absorb water uniformly. Drain the tank completely before adding developer.
4. Developer
Pour 16 ounces (475ml) of developer into the fill port. I typically use HC-110 dilution B or Kodak D-76, both of which work excellently with the SP-445. Start your timer immediately upon filling. Agitate according to your development recipe—I use continuous agitation for the first 30 seconds, then 10 seconds of agitation every minute thereafter. The agitation should be gentle inversions or rotations, not vigorous shaking.
5. Stop Bath
After development time is complete, drain the developer and immediately fill with stop bath solution. Agitate continuously for 30-60 seconds, then drain.
6. Fixer
Fill with fixer (I use Kodak Rapid Fixer) and agitate for the first minute, then intermittently for the remaining fixing time (typically 4-5 minutes total for fresh fixer). After fixing is complete, you can open the tank to inspect your negatives.
7. Washing
The final step is thorough washing. I typically do this by filling the tank with fresh water, agitating, draining, and repeating 10-12 times. Alternatively, you can remove the film from the holders and wash them in a tray with running water for 20-30 minutes, followed by a Photo-Flo rinse.
Results and Image Quality
The most important question is: does the SP-445 produce high-quality negatives? In my experience, absolutely yes. The negatives developed in the SP-445 show even development across the entire sheet, with no streaking or uneven density that can plague other development methods. Edge effects are minimal and consistent. The film holders keep the sheets separated and ensure adequate chemical circulation, resulting in professional-quality results.
I've compared sp-445 film negatives developed in this system with those processed using professional lab dip-and-dunk methods, and honestly cannot detect any quality difference. The scans from both sources show identical tonal ranges, sharpness, and grain structure. For field photographers working with large format, this level of quality in such a compact, affordable system is remarkable.
Limitations and Considerations
Capacity Constraints: The primary limitation of the SP-445 is its capacity—only four sheets per run. For photographers who regularly shoot 10-20 sheets in a session, this means multiple processing cycles. This capacity limitation has led me to explore other tank options for high-volume development sessions, though I still rely on the SP-445 for smaller batches and travel processing.
For photographers who shoot conservatively with large format (as many do, given the cost and deliberate nature of the process), four sheets per session is often sufficient. However, if you're coming back from a multi-day trip with 30-40 sheets to process, you'll need to set aside time for multiple runs or consider a higher-capacity system as a complement to the SP-445.
Chemical Economy vs. Capacity: The flip side of the capacity limitation is remarkable chemical efficiency. Using only 16 ounces (475ml) per four-sheet run means you can mix fresh developer for each session without significant waste or expense. Many photographers prefer this approach, as fresh chemistry ensures consistent results. Larger tanks require more chemistry but can process more sheets—it's a trade-off based on your shooting volume and workflow preferences.
Comparing to Alternative Development Methods
Tray Development: More flexible in capacity but requires a darkroom, uses more chemicals, and increases risk of scratches and handling marks. The SP-445 is clearly superior for convenience and safety.
Jobo Rotary Processors: Excellent results and can handle multiple formats, but expensive ($300-500+) and bulky. The SP-445 at roughly $150 offers better value for photographers focused solely on 4x5 processing.
MOD54 Insert for Paterson Tanks: Similar capacity to SP-445 but many users report uneven development issues. The SP-445's dedicated design seems to produce more consistent results.
Professional Lab Processing: Convenient but costly over time ($5-8 per sheet), with turnaround delays and shipping risks. The SP-445 pays for itself after processing 20-30 sheets.
Long-Term Update and Final Thoughts
After several years of use, I can confidently say the SP-445 has earned its place in my workflow. For smaller batches, travel processing, and situations where I want immediate feedback on my exposures, it remains my go-to solution. The combination of compact size, chemical efficiency, ease of use, and excellent results make it an outstanding value for large format photographers.
While I have added a higher-capacity system to my toolkit for processing larger batches (the limitation I mentioned earlier), I haven't abandoned the SP-445. Instead, it serves a specific role: processing test shots, handling small batches from day trips, and providing a portable solution for extended travel. For photographers just getting into large format or those looking for a reliable, compact development system, the SP-445 is an excellent choice.
Availability and Future Formats
The SP-445 discussed here is specifically designed for 4x5 inch sheet film, the most common large format size. Stearman Press has been working on solutions for larger formats including 5x7 and 8x10, though availability varies. Check their website for current product offerings and specifications.
For photographers working in 4x5 format who want reliable, high-quality development results without the expense and complexity of professional processing systems, the SP-445 Compact Film Processing System represents one of the best solutions currently available. Its thoughtful design, compact size, and consistent results make it a valuable tool for any serious large format photographer.
Note: This review is based on my personal experience and testing. I have no financial relationship with Stearman Press and purchased the SP-445 at full retail price for my own use.
Explore More Large Format Content
If you're new to large format photography or want to learn more about why I choose this demanding medium, explore my other articles: Why I Still Shoot Large Format in a Digital Age explains my personal journey back to film, and Rediscover Magic Beyond Megapixels dives into the artistic and technical benefits of large format. Browse my Utah and Arizona galleries to see large format images captured on location.
Explore Related Photography
Enjoyed this article?
Subscribe for more photography stories, techniques, and exclusive behind-the-scenes content.
Related Posts

Grand Canyon Photography Guide: Best Spots, Light & Timing
The famous south rim overlooks are worth making. But the Grand Canyon images I keep coming back to came from a remote western overlook that requires 60 miles of unpaved road to reach — and from the North Rim in October, when the crowds are gone and the canyon light gets serious.

Best Places to Photograph Snow-Covered Mountains in Winter
Winter transforms mountain landscapes in ways no other season can. Where to go, when to go, and what to expect — from Yosemite's granite walls under fresh snow to Zion's red canyon in a storm.

Analog Landscape Photography: Why Film Still Makes Sense in 2026
Most photographers who've tried 4x5 large format film don't go back to digital for their serious landscape work. Here's the honest case for shooting analog in an era when you have no practical reason to.
Tags

Marty Quinn
Large format film photographer based in Phoenix, Arizona. Shoots on 4x5 Arca-Swiss view cameras across the American Southwest — Utah, Arizona, Death Valley, and the Colorado mountains. 25+ years behind the lens. Published in Outdoor Photographer magazine (The Last Frame, June 2008). About Marty →